How to Make a Free Website for Blogging in 2024 - In this article, I will teach, on how you can make a free website for blogging. Nowadays, blogging is a high-demand job on the internet. Every student and educated person should know about blogging and writing articles online to generate passive income..
I shall discuss the following topics:
- What is blogging online?
- How to make a blogger Website ?
- How to write and publish first article?
What is blogging online ?
Blogging online refers to the practice of creating and maintaining a blog, which is a regularly updated website or web page, typically run by an individual or a small group, that is written in an informal or conversational style.
Blogs often focus on a particular topic or niche, such as travel, fashion, technology, cooking, or personal experiences. Bloggers typically share their thoughts, ideas, expertise, experiences, or opinions through written posts, photos, videos, and other multimedia content.
Blogging allows individuals to express themselves, connect with others who share similar interests, build an audience or community, and even monetize their content through various means such as advertising, sponsored posts, affiliate marketing, or selling products or services.
Overall, blogging online provides a platform for individuals to share their passions, insights, and knowledge with a potentially global audience.
How to make a blogger website free?
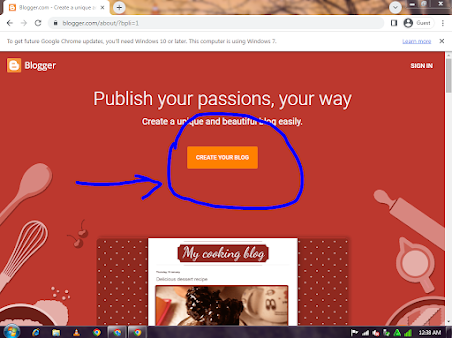
Creating a free website with Blogger is possible by visiting the Blogger website and signing in with a Gmail account. Here is a picture of this scenario.
After visiting the Blogger website, "blogger.com," you will see what I showed in the picture. You'll encounter the "Create Your Blog" option, which you should click on. You will then be redirected to sign in to your Gmail account, where you need to choose whichever account you have.
Now you have an easy step to do
see in this screenshot.
You need to click on finsh button given in right bottom Area of of picture you see.
now you You have filled display name of your blogger.
come to the Next step that is chossing URL or domain of your site or blog. If you choose a taken URL that choosed already for someone else blog you will see an Error message .
The error message example in the picture is: "Sorry, this URL is taken. Choose a different one."
Now, you need to select a different URL that does not match any others.
To avoid the error message, you can add a numeric value to the URL. For example, "tomjarry78.blogspot.com". This should prevent any conflicts and allow you to proceed without encountering the error. After finishing the process, you will see that your website is ready to use. The next step will be shown in the picture below.
In the picture, you'll find the "Create Post" option written at the top left area. Click on it to create a new post. After clicking "Create New Post," you will see the next step in the picture provided below.
In the picture, you can see the "Publish" button along with the area where you can write your content. The provided tools can be helpful if used carefully. After writing your content in the post area, you need to click on the "Publish" button to make your post live.Finally, you have successfully published your first article, as shown in the picture above. Repeat the process to create more posts and keep writing on your blog. Through practice, you will learn to improve your blogging skills even further.
Finally, you have successfully published your first article, as shown in the picture above. Repeat the process to create more posts and keep writing on your blog. Through practice, you will learn to improve your blogging skills even further.
Summary:
In this article, we learned how to create a free Blogger website and how to write and publish our first article on the Blogger site. The illustrated examples provided in the form of pictures were very informative, aiding in understanding the step-by-step process effectively.


0 Comments